Showing posts with label Food/Recipes. Show all posts

Friday, June 13, 2014

Braised Pork Belly Tacos

Oh my goodness, gracious. This is one of my favorite foods I've ever made. Matt says the best ever. My dad tried it and said "meh". I guess it's just a matter of taste. But if you are the pork belly type, you will most definitely like this recipe. 

I've tried pork belly a few different ways and this is my fave recipe. I get pork belly from a Mexican market, this time with ribs still attached but that doesn't really matter. Next time, I'll actually remember to have the butcher remove the skin for me because it is a very laborious task.


The Recipe (from Have Knives Will Cook)

For the pork:
  • 2½ lbs. boneless skinless pork belly, cut into large chunks approx. 4 oz. each
  • 1 cup fresh squeezed orange juice
  • 1 cup white distilled vinegar
  • 4-6 cloves garlic, crushed
  • 1 tsp ground annatto and coriander
  • crushed red pepper (optional)
  • salt & pepper
  • vegetable oil
For the garnishes:
  • queso fresco, crumbled
  • sour cream or Mexican crema
  • fresh pineapple, cut into small chunks
  • fresh cilantro leaves
  • tomatillo salsa (see below)
  • pickled onion (see below)
  • lime wedges
  • 2 dozen soft corn or flour tortillas

The Method
  1. Preheat the oven to 350 degrees F and position the rack in the center of the oven.
  2. Lightly score the pork belly on the fat side by making a few 1/8″ deep cuts.  Generously season the pork belly with salt and pepper.  Heat a few tablespoons of oil in a large skillet or flame-proof roasting dish over medium high heat until it shimmers.  Lightly sear the pieces of pork belly on each side.
  3.  Drain the excess fat from the pan and position the pieces of belly with the fat side down.  Add the orange juice, vinegar, garlic, annatto/coriander, and a pinch of crushed red pepper so that the liquid comes halfway up the pieces of meat. Cover the pan tightly with aluminum foil and bake in the oven 1-1/2 to 2 hours until the meat pulls apart easily with a fork.
  4. While the pork is cooking, prepare the garnishes.
  5. When the pork is cooked, let it rest covered in the cooking liquid for 5-10 minutes before pulling apart.  Once it has rested, shred the meat with a pair of forks, or your fingers and mix it with just enough of the braising liquid to coat each morsel.  Add salt to taste.
  6. Pile up in tortilla with all the yummy garnishes and eat your heart out. Yum!
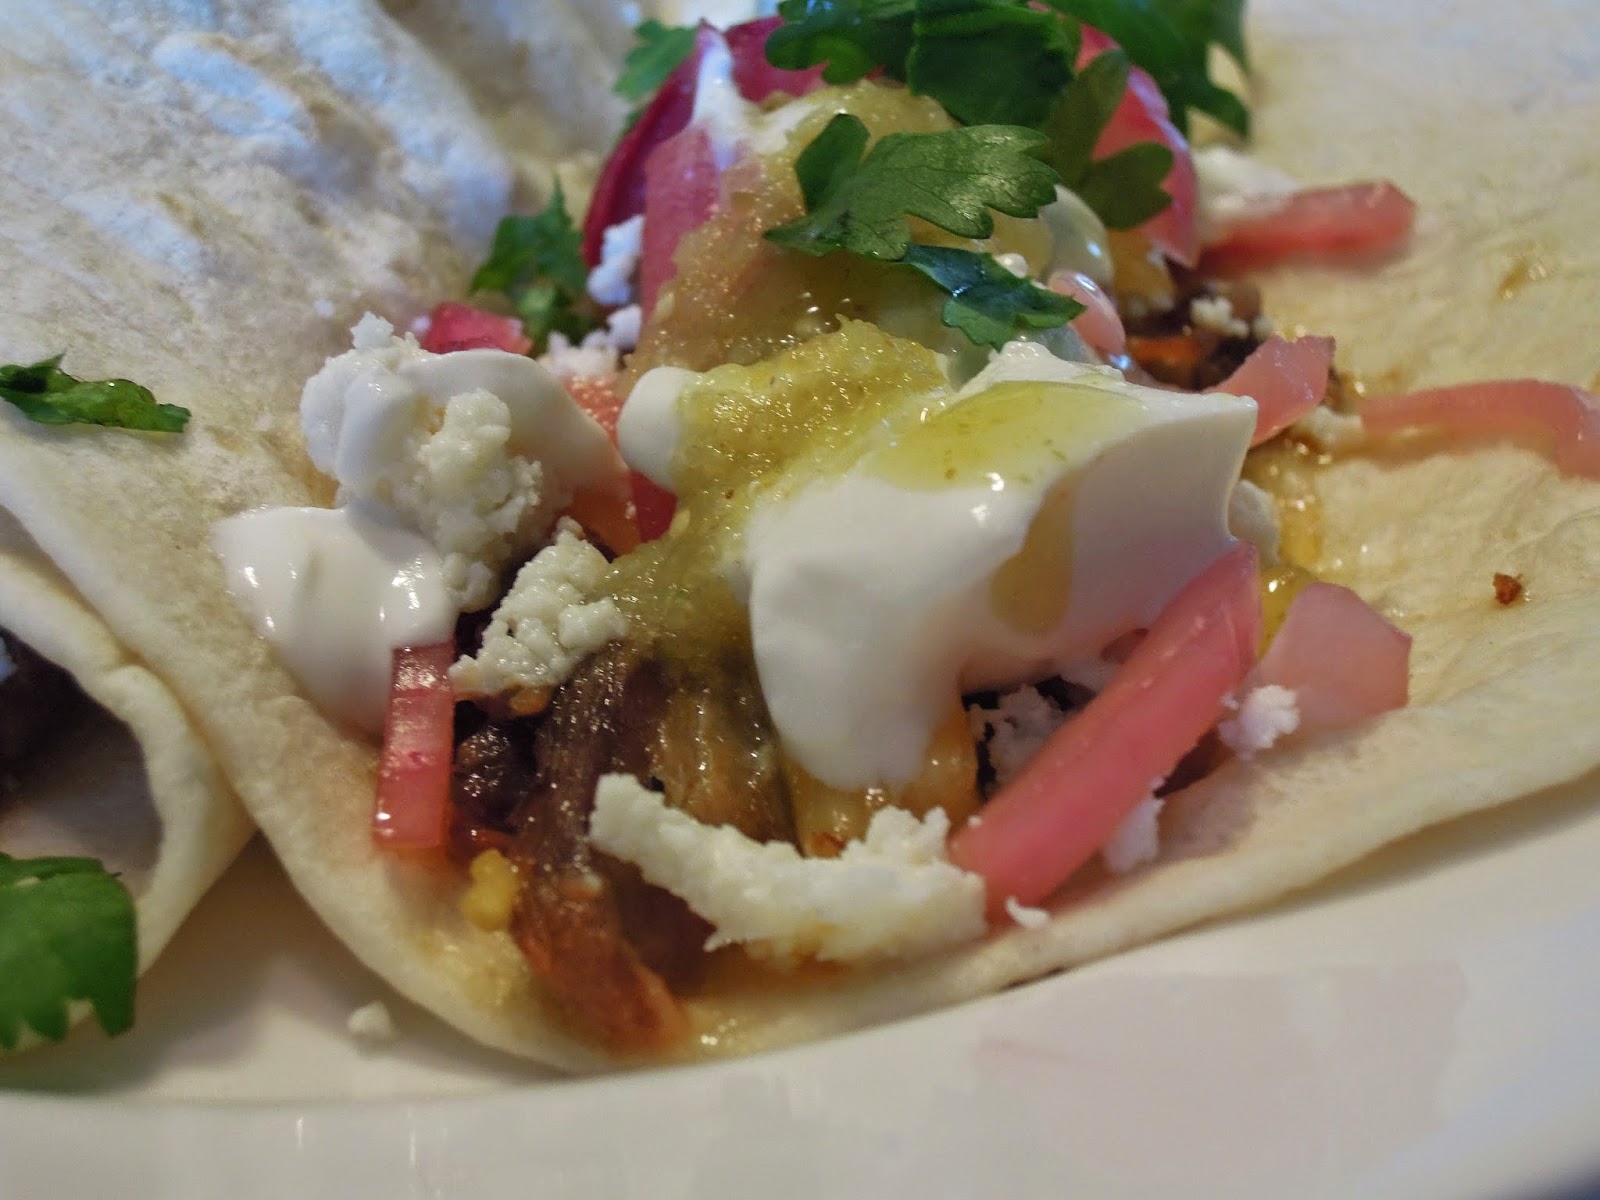

I made some tomatillo salsa and picked red onions to go with it all. Yes, they are delicious and essential. For the onions, I just thinly slice them then add enough vinegar (red wine or apple cider) to cover the onions plus a little sugar or honey. Mix it up, pour into a jar and let it all soak in a few hours. Tomatillo salsa recipe below...
 

Tomatillo Salsa (also from Have Knives Will Cook)

The Recipe
  • 1 lb. fresh tomatillos, husks removed (approx. 4)
  • 1-2 fresh jalepeno peppers (more if you like it hot)
  • 1 small onion, chopped
  • 1 bunch of fresh cilantro leaves, finely chopped
  • 1/2 tsp cumin
  • 1 Tbsp lime juice
  • salt to taste

The Method
  1. Bring a large pot of water to a boil.  Add the tomatillos and jalepenos and cook until the tomatillos turn yellow.  Remove both the tomatillos and the jalepenos and cool them in ice water. Drain.
  2. Remove the stems from the tomatillos and jalepenos.  Combine all the ingredients in a blender or food processor and pulse until the mixture is a rough puree.
  3. For a more chunky salsa, blanch only the tomatillos, cool them in ice water, drain, then dice.  Stem and de-seed the jalepenos and finely dice them.  Combine the diced tomatillos and jalepenos with the remaining ingredients.

Wednesday, July 24, 2013

Creamy Mac and Cheese with Butternut Squash

 This is a newer go-to homemade mac and cheese recipe. I used to make a much more decadent version with whole milk, cream and lots of cheese (see recipe index) but lately my mom life consists of making food that's healthier and toddler friendly but still yummy. I discovered that I can make this particular recipe healthier by taking out some of the cheese and milk and adding butternut squash puree. And when I'm really feeling crazy, I make it with whole wheat or veggie pasta. But let's not get carried away here.

The Recipe
  • 3/4 lb pasta (any small-sized variety)
  • 3 T Butter
  • 3 T Flour
  • 2 cups milk
  • 1 cup butternut squash puree (roast 1/2 butternut squash at 425 degrees, with a little olive oil on top, for about 25 minutes or until fork tender, scoop out flesh and mash or puree)
  • 2 cups cheddar cheese or other sharp cheese
  • salt to taste

The Method:
  1. Preheat oven to 350 degrees.
  2. Cook pasta according to directions, set aside.
  3. Melt butter on low, add flour and keep moving with whisk for about 5 minutes. (This makes a pasty 'roux' that helps thicken the sauce.)
  4. Slowly add milk and simmer on low heat for about 10 minutes until it thickens a bit.
  5. Add butternut squash and cheddar (reserving some cheddar for the top). Heat on low, stirring until all the cheese melts.
  6. Stir in pasta.
  7. Add salt and pepper to taste (I ended up using quite a bit of salt so make sure to taste).
  8. Pour mixture into a casserole dish and top with the extra cheddar.
  9. If you want to add a crunchy topping, mix a few tablespoons melted butter with breadcrumbs, spoon over the top of the mac and cheese and spread evenly.
  10. Bake for about 30 minutes until bubbling and golden brown. Allow to cool a few minutes before serving.


(Toddler approved)

Thursday, May 30, 2013

Back to Food...

I realized that I kind of stopped posting my fave/own recipes. I don't know why because I haven't stopped cooking. In fact, I have made many blog-worthy dishes lately, many that I wish I had written down. Here are a few that I want to remember.

 A muffin and a biscuit...
 I like making food for Lucia. Store bought food tends to lack options and then gets boring. Plus, not always so healthy. I like to have food on hand too since Lucia eats fast, like double-fisted-get-it all-down-as-fast-as-possible kind of fast. 
These two recipes fit the bill.


Cheesy Corn Biscuits


The Recipe (basically from the side of a can of corn)

  • 1 can corn
  • 2 cups Bisquick/pancake mix
  • 1/2 cup milk
  • 1 cup shredded cheese (I used cheddar and queso fresco)
  • pinch salt


The Method
  1. Mix ingredients until soft dough forms
  2. Drop dough into biscuits on parchment lined baking sheet
  3. Bake for 8-10 minutes in 450 degree oven

I give them to Lucia plain but for us I made a scallion, Parmesan butter to schmear all over it. Definitely worth the extra effort.


Oatmeal Yogurt Camping Muffins

The Recipe

  • 2 1/2 cups oats
  • 1 cup yogurt (I used peach flavored, but if you use plain yogurt then just add some sugar to sweeten)
  • 1/2 cup apple sauce
  • 2 mashed bananas
  • 1 1/2 tsp baking powder
  • 1/2 tsp baking soda


The Method
  1. Combine yogurt, apple sauce, bananas, baking powder and baking salt
  2. Add oats and fully combine
  3. Pour into muffin tin
  4. Bake at 400 degrees for 15-20 minutes (or a little less if making mini muffins)

The reason I call them camping muffins because they were my ingenious solution to Lucia wanting to eat first thing in the morning when camping last weekend. And it worked well! (besides the shrill screams when I would leave the tent to go get them). I thought they were not the best tasting muffin I have ever eaten but who cares...Lucia loved every last one of them and they're healthy. Check and check. You could use 2 eggs instead of apple sauce but I prefer to not have to worry if the muffins are fully cooked when I leave them soft for easy eating (plus Lucia reacts to eggs).


Thursday, December 27, 2012

Beef Fried Rice

 My love for beef fried rice is inspired by my love for Ron of Japan. So whenever we go, my sister and I study the ingredients and method since it's one of those cook-in-front-of-you-restaurants. I have tried and failed many times to match the recipe and create a batch that tastes just as good as ROJ's BUT this time, this blessed time, I finally finally think I GOT it! So good and so worth the many trials.


The Recipe:
  • 2 cups white rice
  • 2 eggs
  • 1 lb ground beef
  • 1 large white onion, minced
  • salt and pepper
  • vegetable oil (not quite sure how much)
  • about 6 Tablespoons soy sauce
  • 1 green onion, chopped, for garnish (optional)


The Method
  1. Cook rice and cool in fridge for at least a few hours before using (very important)
  2. Combine onion and ground beef, mashing together with hands. Add rice and fully combine. Season with a teaspoon or so of salt and a little pepper.
  3. Fry eggs in small saute pan, breaking up the yolk a little as it cooks. Set aside.
  4. Add a few tablespoons veggie oil, heat and add 1/3 of rice mix. Season with salt. Cook covered on med-high heat for about 5 minutes, allowing meat to brown. Stir and cook covered again about 5 minutes.
  5. Season with salt, a few tablespoons soy sauce, stir and allow to cook for another 5 minutes or until meat is cooked and rice starts to get a bit crispy.
  6. Repeat steps 4 and 5 with the other 2 parts of the rice mix.
  7. Add egg and garnish with green onion.


Tuesday, December 11, 2012

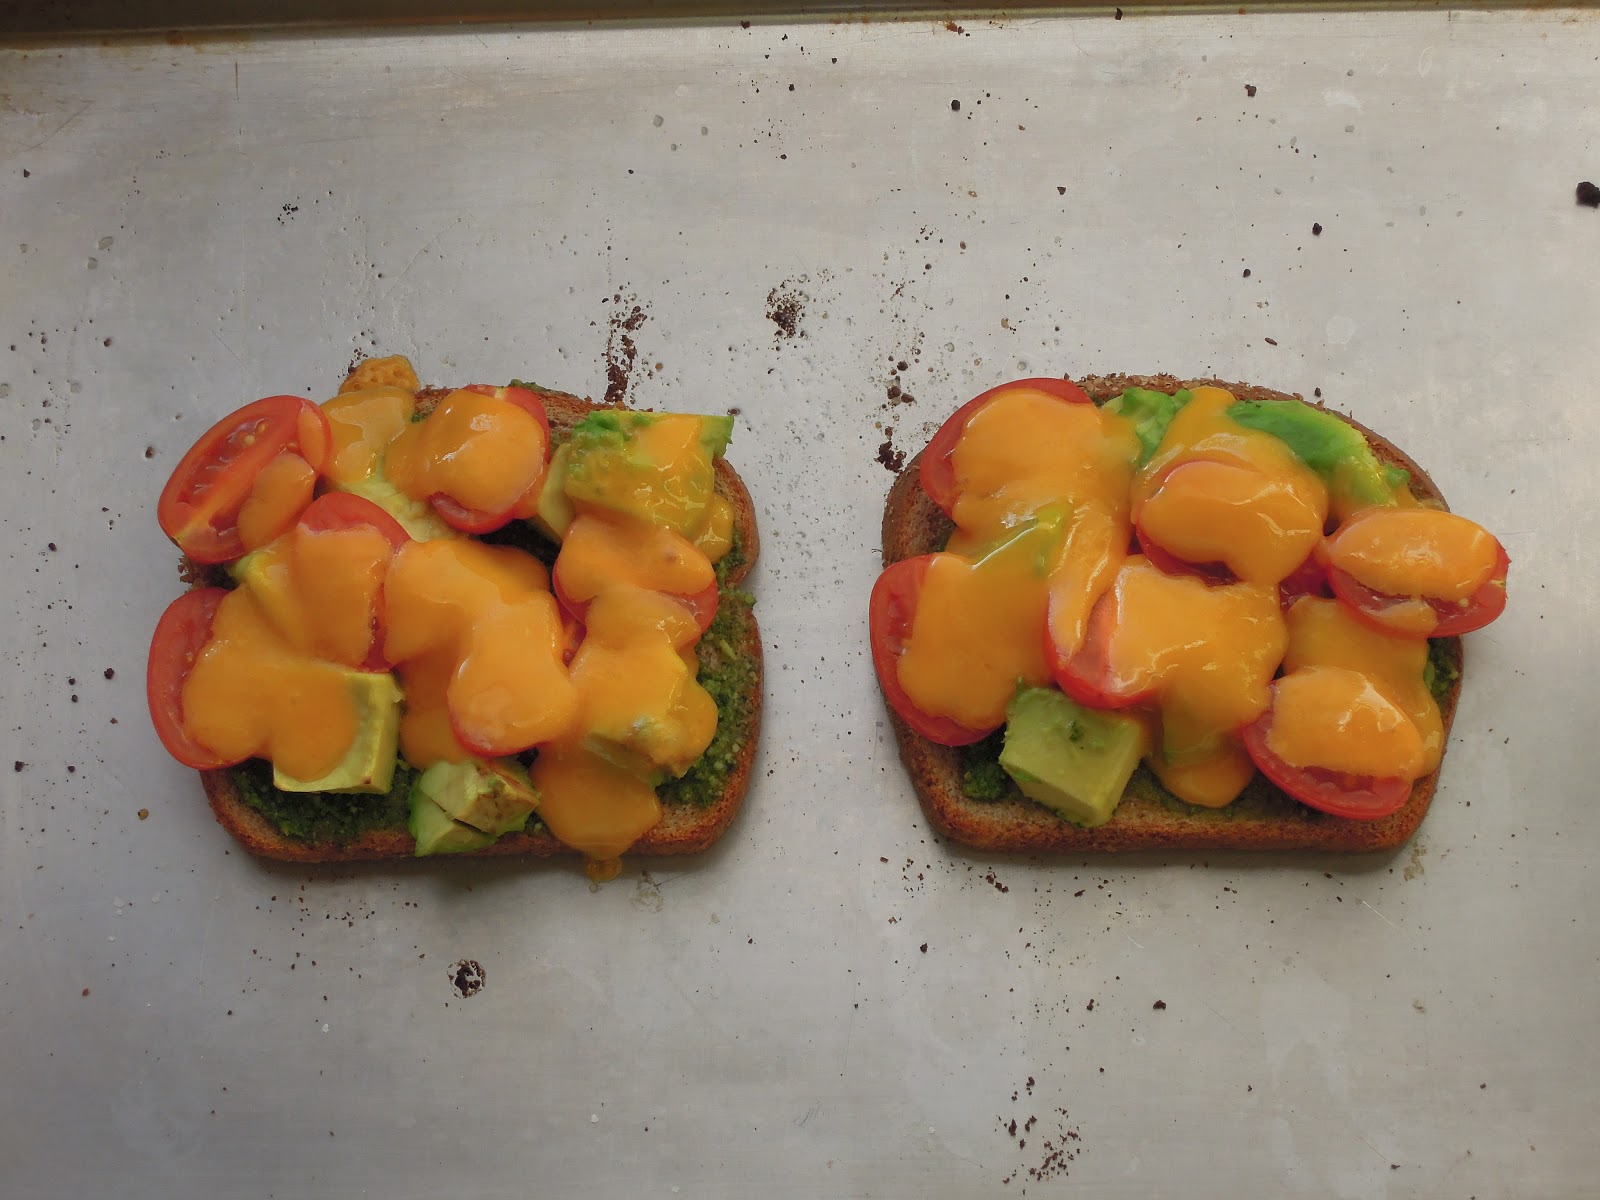
Pesto Avacado Melt

 BEFORE

 The Recipe 
  • 2 slices of bread
  • Pesto (homemade or store bought)
  • 1/2 of an avocado, in chunks
  • 5 cherry or grape tomatoes, halved
  • 5 small slices cheddar cheese
  • Salt


 AND AFTER
The oozing cheese holds it all together

The Method

Layer up with pesto, avocado, tomato, salt and cheese and throw under the broiler for a few minutes.


This is a great way to use up extra pesto. I sometimes get bored of just using it with pasta. So yummy and so simple. Enjoy!

Friday, December 7, 2012

Spanish Tortilla

Don't let the name fool you. A Spanish tortilla is like an egg casserole with potatoes and veggies except without the half and half or heavy whipping cream. And a bit different of a method. I used a mash up of a few different recipes this time but I'm going to try my best to remember what I did. This recipe is versatile, use whatever veggies you love. 

I used these ones:


The Recipe:
  • 4 Yukon gold or small russet potatoes, peeled and thinly sliced
  • 1 small onion, sliced
  • 1 red pepper, diced
  • 4-5 mushrooms, sliced
  • 8 eggs
  • 6-8 tablespoons olive oil
  • salt and pepper

The Method
  1. Preheat oven to 350 degrees
  2. Boil potatoes about 5 minutes, remove from water and lay out on a paper towel lined tray in a single layer
  3. Heat 3-4 tablespoons of oil on med-high heat, add veggies and season with salt and pepper. Saute veggies until tender, about 7 minutes, let cool
  4. Whisk eggs with 1 teaspoon of salt and 1/4 teaspoon pepper, add cooled potatoes, veggies and let sit about 15 minutes (it releases the starch in the potatoes or something)
  5. Add 3-4 tablespoons of oil to a large saute pan, add egg mixture, pushing potatoes to the bottom
  6. Cook on med-high heat for a few minutes
  7. Transfer pan to oven and cook at 350 for about 20 minutes
  8. Allow to cool a few minutes. Invert onto a plate to serve


Thursday, November 29, 2012

Tortellini with Roasted Asparagus and Onion

More Real Food: simple and fast but really good. It's crazy how such a simple thing like roasting the veggies make them so sweet and tasty.


The Recipe (not the most precise but that's how I do it):

  • 1 Package Tortellini (I used cheese)
  • 1 bundle asparagus, cut into 1 inch pieces
  • 1 large white onion, cut into 1 inch chunks
  • a few tablespoons olive oil
  • salt and pepper
  • a few tablespoons butter
  • 1/4-1/2 cup Parmesan cheese


The Method:
  1. Preheat oven to 350 degrees
  2. Toss veggies in oil, salt and pepper. Roast for 25 minutes or until veggies starting to brown on top.
  3. Meanwhile, cook tortellini according to directions
  4. Mix butter, salt and pepper with drained tortellini. Toss in veggies.

Tuesday, November 20, 2012

BLT Pasta

 More real food. And I know it looks simple but this recipe is real good.


The Recipe:
  • 1/2 lb pasta (I used bow tie)
  • 3 cups arugula
  • 6 slices bacon
  • 10-20 grape tomatoes
  • 1/4 cup balsamic vinegar
  • 1/4 cup mayo
  • 1/4 cup creamy salad dressing (like Caesar or ranch)
  • salt and pepper


The Method
  1. Cook pasta according to directions.
  2. Cook bacon. My favorite method is baking bacon (place bacon on foil lined baking sheet, place in oven, turn oven on to 425, check after 20 minutes, bake until crispy)
  3. Mix vinegar, mayo and dressing. Season with salt and pepper.
  4. Layer pasta, about 1 cup to 1 1/2 cups arugula and halved tomatoes. Drizzle dressing on top.


Saturday, November 17, 2012

Real Food: Quinoa Crusted Pork

Since becoming a mom, the time I have each day seems much more precious. I work part-time, watch my sister's daughter while she works part-time and oh yeah, one more thing...taking care of a baby is a time-suck!

Our usual evening routine on my working days is: get home around 6:45, feed Lucia, get Lucia ready for bed, put her to bed, make dinner for us. As you can see, dinner comes last (and late). I grew up eating dinner later so I really don't mind that (and Matt has taken a liking to it) but I am always looking for recipes that don't take much time or effort.  I love making dinner and I think it's an important part of our family life but because it comes at the end of my busy day, I have had to sacrifice some of my more time consuming recipes to the all powerful parenting gods. Real food please!

In general, I am a person that needs a plan. Matt likes to tease me for my inability to answer open questions. What's your favorite movie? My mind goes blank. Not only can I not think of my favorite movie, but I cannot think of a single movie or only the dumbest ones. The same thing happens when I go to the grocery store without a plan or list. I just go blank. No ideas, or just bad ones. I need ideas! And what better ideas than my own? The other day I hunkered down and wrote down like one million 'real food' ideas and I want to keep those ideas alive. I am going to attempt to jot down the ones that work (electronically, in the form of this blog) so that I can check back for ideas when I draw a blank.

I am not professing that these recipes are the fanciest but ones that work for our family in this phase we find ourselves in. The criteria for my 'real food': real good, real ingredients, real quick and real-istic.

So I'll start with the quinoa-crusted pork I made the other night...

The Recipe:
  • 3-4 boneless pork loins
  • 1 cup barbecue sauce
  • a few dashes Worcestershire sauce
  • a few dashes soy sauce
  • a few dashes siracha chile sauce
  • salt and pepper
  • 1/2 cup quinoa
  • 3/4 cup Italian breadcrumbs
  • Olive oil 

The Method:
  1. Preheat oven to 350 degrees.
  2. Season both sides of pork with salt and pepper. Make marinade: mix together barbecue sauce, Worcestershire, soy sauce and chile sauce. Cover pork in mixture and marinade in the fridge for 30 minutes (flipping pork half-way through).
  3. In the meantime, mix quinoa and breadcrumbs together. Season with salt and pepper.
  4. Let pork come to room temp. for about 10 minutes.
  5. Heat some olive oil in a shallow, oven-proof saute pan.
  6. Shake the excess marinade off each piece of pork, cover all sides in quinoa mixture. Sear on med-high until browned, about 4 minutes. Sear other side for a few minutes.
  7. Finish cooking by putting the whole pan in the oven for 15-20 minutes or until meat registers at 150 degrees.

(The marinade could be varied in many ways. I just made this one up from the stuff we had around. You could also add shredded Parmesan to the quinoa mixture. I served this with simple roasted potatoes and salad.)

It's not long now til we are in the next phase when Lucia will be eating dinner with us too and trying all the foods that we love!

Sunday, August 5, 2012

Blue-Rasp-Straw Berry and Rhubarb Muffins


I don't bake much. I prefer the 'taste-as-you-go' cooking thing rather than the 'exact-measurements-only' baking thing. That being said, these were my most favorite thing that I have ever baked. I will definitely make them again.


The Recipe: adapted from here

  • 2 cups flour
  • 1 Tablespoon baking powder
  • 1/2 teaspoon salt
  • 1 egg
  • 1 cup sugar
  • 4 Tablespoons unsalted butter, melted and cooled
  • 1 1/4 cups sour cream
  • 6 oz. (1 1/2 cups) berries (I used a cup blueberries, 1/4 cup raspberries and a few tablespoons of strawberry/rhubarb jam).


The Method:
  1. Preheat oven to 350 degrees. Spray 12-cup muffin tin (or 2 12-cup mini muffin tins) with vegetable oil spray.
  2. Whisk flour, baking powder and salt in medium bowl until combined.  
  3. Whisk egg in second medium bowl about 20 seconds.  
  4. Add sugar and whisk vigorously until thick, about 30 seconds.  
  5. Add melted butter in 2 or 3 steps, whisking to combine after each addition.  
  6. Add sour cream in 2 steps, whisking until just combined.  
  7. Add berries to dry ingredients and gently toss to combine (don't add jam yet if you are using).  
  8. Add dry ingredients to sour cream mixture and carefully fold with rubber spatula until batter comes together and berries are evenly distributed, 25-30 seconds (small spots of flour will remain and batter will be thick). Swirl in jam if using.  Do not overmix.  
  9. Divide batter evenly between muffin cups. (I made mini muffins and baked for less time.) If you want, sprinkle sugar over muffins as a topping.  
  10. Bake until muffins are golden brown and toothpick inserted in center of muffin comes out with few crumbs attached, 25-30 minutes, rotating tin halfway through baking.  
  11. Invert muffins onto wire rack, stand muffins upright and let cool for 5 minutes.


Saturday, August 4, 2012

Chicken Tacos


These are really good! It's all about the sauce made from an interesting combo of ingredients that I wouldn't think to put together like OJ, chipotle peppers, cilantro and mustard. I saw this recipe on America's Test Kitchen (I love PBS cooking shows!) but I'm too cheap to subscribe to the website to get the recipe so I googled it and found it from some random blog. And now I just need to write it down myself so I don't forget it. I mean, that's actually the point of me writing out all these recipes...I tend to make something once, love it, then forget about it unless I record it in some way. Anyway...


The Recipe:
  • 3 tablespoons butter
  • 4 cloves garlic, minced
  • 2 teaspoons chipotle peppers in adobo sauce, minced
  • 1/2 cup orange juice
  • 1 tablespoon Worcestershire sauce
  • 3/4 cup fresh cilantro, chopped
  • 1 1/2 pounds boneless, skinless chicken breasts or tenders
  • 1 teaspoon yellow mustard
  • salt and pepper to taste
  • 12, 6-inch flour tortillas
  • For serving: grated cheese, shredded lettuce (I used spinach), chopped tomato, diced avocado, sour cream

The Method:
  1. Melt butter in large skillet over medium high heat. Add garlic and chipotle peppers and cook until fragrant, about 30 seconds. Stir in orange juice, Worcestershire sauce and 1/2 cup of the cilantro.  Bring to a boil.
  2. Add chicken and simmer, covered, over medium-low heat until chicken is cooked through and registers 160 degrees, about 10-15 minutes, flipping chicken half-way through cooking.
  3. Remove chicken from sauce mixture, transfer to a plate and set side, tenting with foil.
  4. Increase heat to medium-high and cook until sauce is reduced to about 1/4 cup, about 5 minutes. Remove from heat and whisk in mustard.  
  5. Using 2 forks, shred chicken into bite-sized pieces.  
  6. Return chicken to the sauce. Toss with remaining cilantro and toss until well-combined.  Season with salt and pepper to taste. Serve in tortillas with desired toppings.


Thursday, June 14, 2012

Simple Egg Dish

I have been tweaking this basic egg casserole recipe so now I need to write it down before I forget it! We always seem to end up with lots of eggs and this is a great way to use them up (breakfast for dinner, anyone?). And very versatile, I just use whatever veggies I happen to have...there is an endless list of good combos. Oh, and that beautiful pink jam is my homemade rhubarb-strawberry jam, yum! (recipe found here).


Recipe:
  • 8 eggs
  • 1/3 cup half and half (plus a splash of milk for good measure)
  • 1 teaspoon salt
  • 1 1/2 cups sharp cheddar cheese
  • veggies/meat (this time I used bacon, red pepper, onion and mushrooms)

Method:
  1. Whisk eggs, add half and half (and milk). Add salt and most of the cheese, set aside.
  2. Bake bacon (my method: place bacon on foil-lined baking sheet. The baking sheet needs edges to catch the grease. Place in cold oven, turn oven to 400. Check after 20 minutes but keep on baking till desired crispyness.) Allow to cool.
  3. Saute onion, red pepper and mushrooms in olive oil for a few minutes. Season with salt and pepper. Allow to cool.
  4. Add bacon and veggies to the bottom of a buttered casserole dish, spreading evenly. Pour egg mixture over veggies and top with the rest of the cheese.
  5. Bake at 425 for 20-25 minutes or until top is browned.

Friday, June 1, 2012

Tilapia with Lemon, Garlic and White Wine Sauce

I'm not much of a fish person. Basically, I only really like the kind of fish that doesn't actually taste like fish. For this reason tilapia seems to be my go-to and this is my go-to recipe for it...


Sometimes I add veggies like fresh asparagus or green beans under the fish when cooking but you can leave it without as well.


The Recipe and Method:
  1. Preheat oven to 400.
  2. Season both sides of 4 fillets of fish (give or take a fillet) with salt and pepper and lay on foil lined baking sheet (with veggies below if using).
  3. Sprinkle a few tablespoons each of olive oil and white wine over the top of the fish.
  4. Mince 2 cloves of garlic and sprinkle over top.
  5. Cut one lemon in half and another into thin slices. Add the juice of half the lemon over the fillets (For extra flavor, reserve other half of lemon for lemon butter to top fish after cooking...heat the juice of the lemon in a small pan until it starts to simmer, turn off heat, swirl in one tablespoon of butter.) Top each fillet with a few slices of lemon.
  6. Place a piece of foil covering all of the fish, fold up edges with the bottom piece of foil so that everything is enclosed.
  7. Bake for 20 minutes.

 
Right before baking.


Fish packet!


All done and ready to eat.


Thursday, May 17, 2012

Simple Quinoa and Corn

 I have been a fan of quinoa since living in Bolivia where it is a staple and has been since the time of the Inca's (not a trendy health food!). There are so many ways to eat it and so many good recipes you can include it is, both savory and sweet. This recipe has become one of my favorite ways to make quinoa. It is so simple that you can barely call it a recipe.

Just boil 1 cup of quinoa in water for about ten minutes, adding 2 cups frozen corn to the water for the last few minutes. Drain then add a tablespoon or so of butter and salt and pepper to taste. This makes a lot so good thing it makes for good leftovers too!

Friday, April 20, 2012

Avocado and Arugula Pesto Pasta

 I took a little break from cooking/baking when Lucia was born but we that didn't mean we took a break from home cooked meals because I froze a bunch of good food when I was still pregnant. I have since started cooking again but this was one of those frozen meals that was very good and super easy to make.

I used a recipe from foodnetwork.com and made a few changes. 
You can find the original here.


The Recipe:

  • 1 pound pasta
  • 2 medium avocados, halved, peeled, and seeded
  • 3 cups baby arugula leaves (3 ounces)
  • 1 packed cup fresh basil leaves
  • 3 tablespoons fresh lime juice, about 2 large limes
  • 2 cloves garlic, peeled and smashed
  • 1 teaspoon salt
  • 1/2 teaspoon pepper
  • 1 cup grated Parmesan
  • 1/2 cup pine nuts, toasted (toast in dry saute pan for a few minutes)

The Method:
  1. Cook pasta, save about 1 cup of the pasta water before draining. Place in a serving bowl.
  2. Place avocados, arugula, basil, lime juice, garlic, half of the pine nuts, salt, and pepper in a food processor and blend until smooth.
  3. Pour the pesto over the pasta and toss together (I actually only used half of this recipe with 1 lb of pasta). Add the cheese and toss together until coated, adding a little of the reserved pasta water if the sauce is too thick. 
  4. Top with a little more cheese and the rest of the pine nuts. I also added baked chicken pieces and bacon to make it an even heartier dish.  


If you want to freeze for later use, just transfer desired serving sizes of pesto into freezer friendly containers and place in freezer. Just thaw in the fridge the day before you want to use it then follow directions 3 and 4.

Wednesday, February 22, 2012

Chocolate Mousse

I made some chocolate mousse for a little Valentine's Day dessert and oh my gosh...it was so good. It was my favorite thing that I have made in a long time. Making any mousse involves a few steps but it is so worth it. I followed a recipe from foodnetwork.com...


The Recipe (also found here)
  • 8 ounces semisweet chocolate, chopped fine
  • 4 large egg yolks
  • 6 tablespoons sugar
  • 1 3/4 cups heavy cream
  • 2 teaspoons vanilla extract
  • Pinch of salt

The Method
  1. Melt the chocolate by adding to a bowl placed over simmering water and stirring until melted and smooth. Remove from the heat.
  2. Whisk together the egg yolks, 4 tablespoons sugar, 3/4 cup heavy cream and a pinch of salt in a medium 2-quart curved bottom saucepan.
  3. Place over medium heat and stir constantly until the mixture is thick, about 3 minutes. Whisk in the chocolate and vanilla.
  4. Strain the mixture into a large bowl using a fine mesh sieve and place in the refrigerator until chilled, at least 30 minutes.
  5. Beat the remaining 1 cup heavy cream and remaining 2 tablespoons of sugar until stiff peaks form. Gently fold the whipped cream into the chilled chocolate.
  6. Divide the mousse evenly among 4 individual serving dishes and cover with plastic wrap. Place in the refrigerator to chill for at least one hour.


You've gotta try it!

Monday, February 20, 2012

Mac and Cheese

I've used the same mac and cheese recipe for some years now and every time I make it I am underwhelmed. It just isn't creamy enough and doesn't have enough of a sharp cheesy bite. It was time for a change. I tweaked my recipe by adding cream cheese for added creaminess and changed the kinds of cheese to give a better cheese taste. So this is my new and improved recipe (not that I ever posted my old one) and I am pretty happy with it!


The Recipe:

  • 1 lb elbow macaroni noodles
  • 3 cups milk
  • 1 cup heavy whipping cream
  • 1 1/2 cups sharp cheddar cheese, shredded
  • 1 1/2 cups asiago cheese, shredded
  • 1 cup cream cheese (equals an 8 oz. package)
  • 3 Tablespoons flour
  • 3 Tablespoons butter
  • Salt and pepper
  • Optional topping: 2 cups plain breadcrumbs, 3 Tbl. melted butter

The Method:
  1. Preheat oven to 350 degrees.
  2. Cook pasta according to directions, set aside.
  3. Melt butter on low, add flour and keep moving with whisk for about 5 minutes. (This makes a pasty 'roux' that helps thicken the sauce.)
  4. Slowly add milk, cream and simmer on low heat for about 10 minutes until it thickens a bit.
  5. Add cream cheese, cheddar and asiago (reserving some cheddar and asiago for the top). Heat on low, stirring until all the cheeses melt.
  6. Stir in pasta.
  7. Add salt and pepper to taste (I ended up using quite a bit of salt so make sure to taste).
  8. Pour mixture into a casserole dish and top with the extra cheddar and asiago cheeses.
  9. If you are adding the topping, mix melted butter with breadcrumbs, spoon over the top of the mac and cheese and spread evenly.
  10. Bake for about 30 minutes until bubbling and golden brown. Allow to cool a few minutes before serving.

I love this recipe! But that doesn't mean that I won't continue to tweak it a little, maybe trying different cheeses just for fun. Speaking of, Trader Joe's is a great place to get some of those 'fancier' cheeses for cheaper.

Thursday, February 9, 2012

Banana, Nutella and Peanut Butter Milkshake

So there I was, about to make my usual fruit smoothie when I remembered a milkshake recipe I had seen on Pinterest made with bananas, nutella and peanut butter so I went for it. I was too lazy to actually look up the recipe so I just made my own version (I figure it's hard to go wrong here).


The Recipe: (this is not the most exact recipe)

  • 3 frozen bananas, cut into pieces
  • 2 heaping spoonfuls nutella
  • 2 heaping spoonfuls peanut butter
  • a bit of sugar (just a teaspoon or so)
  • some milk (maybe 3 cups?)
  • about 8-10 big ice cubes


The Method:

Combine all ingredients and blend together until smooth. Add more milk if it's too thick. Enjoy!


Yum.

Saturday, February 4, 2012

Pasta and Quinoa Salad with Creamy Balsamic Dressing

This recipe has a few things going for it: it's healthy, easy and good. It's also easy to adapt to your taste so just add whatever veggies you like or add some feta cheese for even more flavor. I like to use rotini pasta because the quinoa gets stuck in the spirals. And quinoa may sound fancy but it's really easy to cook and very good for you.


The Recipe:

  • 1 lb rotini pasta (whole wheat if you want even healthier)
  • 1 cup quinoa
  • 1 cup cucumber, cut into chunky pieces
  • 1 cup fresh tomato, cut same size as cucumber pieces
  • 1 cup yellow/red pepper, cut same size as other veggies
  • 1 can white cannellini beans, drained and rinsed
  • salt and pepper
  • Creamy Balsamic Dressing (combine 1/4 cup balsamic vinegar, 1/4 cup mayo, 1 tsp. honey, some salt and pepper, then drizzle in about 3/4 cup olive oil while whisking. It's hard for me to put this into measurements though cause I do it by sight and taste...so make sure to taste! I use this dressing for lots of different salads and pasta salads. Like this recipe.)


The Method:
  1. Cook pasta as directed with one added piece...add quinoa to the boiling water at the same time as the pasta as it takes around the same time to cook. Drain with fine mesh sieve or colander with smaller holes to make sure to catch all of the quinoa. Transfer to a medium/large bowl and allow to pasta/quinoa to cool a bit.
  2. Add veggies and enough dressing to coat. Taste, add more dressing if necessary and salt and pepper to taste.
  3. Eat immediately or after cooled in the fridge. Leftovers store well in the fridge.
Oh, one more thing...I usually add baby spinich to this as well. Just add a few cups to the pasta/quinoa right after you drain it, stir and cover for a few minutes. The heat from the pasta wilts the spinach just a little and it shrinks just a bit. Stir again then continue to follow the recipe by stirring, transferring to a medium/large bowl and allowing to cool before adding veggies.
Related Posts Plugin for WordPress, Blogger...