Wednesday, June 22, 2011

Very Simple Vanilla Yogurt Dessert

I know this looks boringly simple but you just have to trust me; it is so good! I used to babysit for a family that would give this to their kids as a dessert. Pretty genius really; they're eating mostly low-fat yogurt and fruit but add a few chocolate chips and they think they're eating dessert. Well, I used to make some for myself too and got hooked! And for someone like me who doesn't crave sweets much, it's perfect for dessert.


Just combine vanilla yogurt, sliced strawberries and top with chocolate chips (best when frozen) and enjoy! You could make it more complex with extra toppings but I like it just the way it is.


And I have to admit...I staged the above cute little cup just to look pretty but then I dumped it into a bowl and had a portion more like this...

Saturday, June 18, 2011

Cheesy Chicken Enchiladas

I can't remember where I originally got this recipe from but I have changed it so many times that it doesn't even matter; it's mine now. This is one of my favorite go-to recipes just because it is so very yummy. Not the healthiest one but you can improve that by making it with plain yogurt instead of sour cream. I did that when I lived in Bolivia and had no access to sour cream and it was just as good! This recipe takes a bit more prep work but definitely worth it.


The Recipe:
  • 3 bone-less, skin-less chicken breasts
  • 12 small tortillas (I prefer flour)
  • 2 cups sharp cheddar cheese, grated
  • 1 1/2 cups sour cream or plain yogurt
  • 2 14 oz. canned tomatoes
  • 1 14 oz. can tomato sauce or puree
  • 1 medium onion, chopped
  • 2 cloves garlic, minced
  • 1/2 jalapeno pepper, minced, seeds discarded for less spicy (optional)
  • 6 Tbl. olive oil
  • 1/2 tsp. dried oregano
  • 1/2 tsp. dried basil
  • 1/2 tsp. ground cumin
  • 1/2 tsp. white sugar
  • salt and pepper, to taste


The Method:
  • Preheat oven to 350 degrees
  • Place chicken in baking dish, season with salt and pepper on both sides, pour 3 Tbl. of olive oil on top of the chicken, cover with aluminum foil, and bake until meat thermometer reads 160 deg. (around 35 minutes)
  • You can leave oven on because you will bake the enchiladas once assembled.

The Sauce:
  • In the meantime, start the sauce by heating remaining 3 Tbl. olive oil, add chopped onion, season with salt and pepper and saute until onions are soft, about 5 minutes
  • Stir in garlic and jalapeno to onions, saute for another minute or so
  • Stir in canned tomatoes (plus sauce from cans), and tomato sauce. I like to use whole canned tomatoes and squish them up with my hands before adding
  • Stir in oregano, basil, cumin and sugar
  • Bring sauce to a boil, lower heat, cover and simmer for about 20-25 minutes

The Assembly:
  • When chicken is finished, you can begin to assemble the enchiladas (you don't need to wait for the sauce to finish simmering)
  • Shred or chop up chicken into narrow pieces (you can see picture below to get an idea)
  • Set up an assembly line of the chicken, sour cream and cheese
  • Spoon a bit of sauce (whatever stage it's in) on the bottom of the pan, just enough to cover the bottom
  • Take one tortilla, spread a little sour cream across the middle from one edge to the other, add a few pieces of chicken and top with about 1 Tbl. of cheese. Roll up tight and place in pan on top of sauce.
  • Repeat this with all the tortillas until it fills up the pan (just one layer)

Finishing things off:
  • When sauce has finished simmering, turn off heat and stir in the remaining sour cream (plus a little more if you so desire; I add about 1 cup to the sauce). Taste the sauce to check the seasoning and add a little more salt and pepper if need be.
  • Pour the sauce on top of the assembled enchiladas and spread to even out. Top with the remaining cheese.
  • Bake for 30 minutes (also at 350 deg.) and let cool for about 5 minutes before dishing out.

Here are a few photos from along the way...

Assembling the enchiladas.


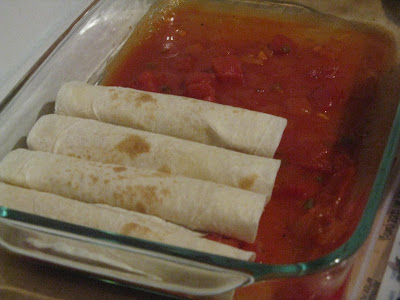
Placing in the pan once assembled and tightly rolled up. Notice the sauce on the bottom. Keeps everything nice and moist.


As you can see, 12 small tortillas perfectly fills up this baking dish!


This is once the enchiladas are topped with sauce and cheese but it stills needs to be baked for 30 minutes.

I like that the sauce is chunky and that there is lots of it. These enchiladas are also really good reheated so feel free to make lots of them.

Enjoy!

Thursday, June 16, 2011

Making Oatmeal Crumble Bites with Rhubarb and Strawberry Jam (with my niece)

Our five year old niece slept over at our place last weekend. At her request, she got to come hang out with her aunt and uncle in the city and stay at our apartment all by herself. She had lots of fun and so did we! The highlight for Gwen...


Getting to go to the near-by candy store!
And then of course eating as much of that candy as fast as possible (even leaving her gum by her bed so that she could have some right when she woke up...and that is exactly what she did).


My favorite part...
Baking a yummy breakfast together!
Gwen is ready with the rhubarb. We made these Oatmeal Crumble Bites with Rhubarb and Strawberry Jam on top. I adapted the recipe from this breakfast food blog. It's a bit of a stretch to say it is a 'breakfast' item but hey, there's oatmeal! I would definitely recommend trying these out for breakfast or otherwise.

The Recipe:

The oatmeal crumble part: (to make 12 muffin sized bites, I would double the crumble recipe but the jam recipe can stay the same)

Combine the following:

  • 6 TB butter
  • melted and cooled
  • 3/4 c. brown sugar
  • 1/2 c. rolled oats
  • 1/2 c. flour
  • 1/2 teaspoon ground cinnamon
  • a big pinch of salt


The Method:

  1. Preheat oven to 375ºF
  2. Butter a muffin pan and fill each cavity a little over half way with the crumble mixture (if there is leftover, you can use to top).
  3. Bake until golden brown, about 10 minutes. Let cool slightly.


Now for the strawberry-rhubarb jam:

  • 4 stalks, trimmed, cut into 1” pieces
  • 1 cup sliced strawberries
  • 1/4-1/2 c. sugar
  • 1 teaspoon vanilla extract
  • the zest of a lemon
  • a squeeze of lemon juice

Combine jam ingredients in a saucepan and cook over medium-low heat until bright pink and jammy, adding more sugar along the way if necessary.


Finishing things off:

  • Top each crumble with a spoonful of the rhubarb. If you have extra crumble then sprinkle a little more of it and bake for another 8-10 minutes, until the oats are golden and the jam is bubbly.
  • Cool for five minutes in the pan, then carefully scoop the cookies out with a spoon.
I love how it turns from this...


...to this! It's like magic.


The recipe shows how to make them all in one shot but we made and baked the crumble part and made the jam the night before. Then in the morning we topped with jam and baked them off. It worked out well and made it quicker to put together in the morning.


Here's how they turned out.


And I would recommended a good fruit smoothie to go with them.


And lastly, here's Gwen making some of her signature funny faces...


And for real lastly, the beautiful vase Matt gave me for my birthday put to good use.

Friday, June 10, 2011

Iron and Wine in the Garden

We were among the millions of people at the free Iron and Wine concert at Millennium Park this week. I mean, there weren't millions of people but it felt like that because it was SO crowded. We knew it was going to be crowded and even prepared for that by having some friends save some spots for us on the lawn.

WELL, by the time we got there, security had closed off the lawn because there were too many people.

SO, we ended up sneaking around a fence to get into the garden behind the lawn and it was one of those very happy accidents. It was beautiful back there and instead of feeling like sardines in a can like everyone else, we could spread out and enjoy the music. I'm sure it would have been better to actually get into the lawn and hang out with our friends but it turned out alright.

From this angle, it looks like were just hanging out in some mansion's backyard not in downtown Chicago.


Trying to get a better view


Love summer nights in Chicago!!! And Iron and Wine!

Tuesday, June 7, 2011

Happy Birthday to Me!

It was my birthday on Sunday and it was a great day celebrating with friends and family. Matt especially did a great job of making me feel special; I have a great husband!

A highlight for me was the angel food cake my mom made. For someone who doesn't like cake...I love this cake! And if you know the Wallgrens then you know that there is a tradition behind it. My grandma used to make it for my mom and her and her sisters every birthday growing up and my mom did the same for (me and) my siblings. I mean, I think she meant to make one for me every year but somehow I slipped through the cracks.

A few years ago my mom didn't make the cake for my older sister for some reason and my sister said it was the first year she hadn't had this cake in her life. And I was like "What are you talking about? Mom hasn't made it for me since I was little!" So I wondered about my other siblings and yep, turns out they have never missed a year either. What!?! Well, we figured out that I missed out on the birthday cakes since my birthday is in the summer and we weren't always home. Whatever, I'm over it.

Well, my mom came through this year! You're never too old for a home-made, mom-made birthday cake.


The best part is the icing! Here's the family recipe...tried and true.


A picture from my parent's house of my sisters holding me the day I was brought home from the hospital. They were also, unknowingly (to them and my parents), at this very moment, giving me the chicken pox! Well, 2 pox at least.


And me with my littlest niece, Naomi.

And the party continued at one of my favorite restaurants, Ron of Japan. I didn't take any pictures but I did get some secrets from the chefs (more on that another time). Thanks to Matt for organizing everything and making it a great day!

Wednesday, June 1, 2011

Bacon and Egg Breakfast Burritos with Ricotta Spread (and some great friends to make them with)

Our good friend Ashley was in town from Minnesota a few weekends ago. It was wonderful to spend time with her and a great excuse to have some extra time with the girls (Matt was there most of the time too...it was fun hanging out with you too, Matt!) It was just a great, full, lovely weekend. And we even had a chance to make some yummy food...

So first the food then a few extra pics from the weekend...

So good! Avacado? check. Tomato? check. Cheese? check. Oh yeah, 3 kinds! Bacon? check.
What more could you ask for?


Here's a close-up of all the insides...

The Recipe: (for 4 people or so)

  • Flour tortillas
  • 1 avocado, sliced
  • 1 tomato, sliced
  • Some shredded cheddar cheese
  • 8-10 slices of cooked bacon
  • 6 or 7 scrambled eggs (I whisk the eggs together with a few tablespoons of milk, cream, whichever I have around, and some salt and pepper)
  • Ricotta spread (recipe below)

The Method:
  1. Warm the tortillas
  2. Spread some ricotta on each tortilla
  3. Layer up with egg, bacon, tomato, avocado and cheese (microwave for 30 seconds to melt the cheese)

Ricotta spread recipe: mix the following together
  • 1 cup ricotta cheese
  • 3-4 Tablespoons sour cream
  • 1/4 cup grated Parmesan cheese
  • salt and pepper to taste
Ricotta spread above. (We all agreed that this was the key element to the breakfast burritos)


And now a few pics from the weekend...
Janine, Ashley, Me and Christine. Crazy to think that we have known each other now for almost 10 years!


Lots of laughs


And good food. (I know this isn't actually food but the picture is from a restaurant so it's pretty close.)


And more laughs


Gotta walk to FO Mahones in our neighborhood


I don't know...no explanation


I liked the lighting. (And the subject)


Thanks for coming, Ashley! We'll see you soon when we come to MN.
Related Posts Plugin for WordPress, Blogger...